この記事は Vim 駅伝 2023-05-10 の記事です。
vim.ui.input を自作した。僕の作ったやつの紹介。
作ったのは 3 ヶ月ほど前、現在も使っているが特に問題は起きてない。
作ったもの
LSP の rename アクションを実行した時の動作。
vim.ui.input()
関数 vim.ui.input() のシグネチャは次の通りである。(:h vim.ui.input())
input({opts}, {on_confirm})引数について help から引用する。
Parameters:
  • {opts}        (table) Additional options. See |input()|
                  • prompt (string|nil) Text of the prompt
                  • default (string|nil) Default reply to the input
                  • completion (string|nil) Specifies type of completion
                    supported for input. Supported types are the same that
                    can be supplied to a user-defined command using the
                    "-complete=" argument. See |:command-completion|
                  • highlight (function) Function that will be used for
                    highlighting user inputs.
  • {on_confirm}  (function) ((input|nil) -> ()) Called once the user
                  confirms or abort the input. `input` is what the user
                  typed (it might be an empty string if nothing was
                  entered), or `nil` if the user aborted the dialog.
opt に基づいて floating window を作成し、適当なタイミング(<CR> などで)で on_confirm を実行すれば良いことがわかる。
僕の作成した vim.ui.input は opt.prompt と opt.default のみ対応していて、opt.completion などには対応していない、よくわからないし面倒だったから。
実装
以降 lua/rc/ui/input.lua に書いていく。行頭には次のものが先に定義しておく。
local M = {}

local api = vim.api
local cache_bufnr = nil
Highlight グループと sign の定義
floating window のための色とプロンプトのための文字を定義しておく。
require('rc.util').highlight.set {
    InputFloatBorder = { fg = '#006db3' },
    InputFloatTitle = { fg = '#6ab7ff' },
    InputPrompt = { fg = '#5c6370' }
}

vim.fn.sign_define('InputPrompt', {
    text = '❯',
    texthl = 'InputPrompt'
})なお、require('rc.util').highlight.set() は次のようになっている。
---@param hls table
---@return nil
function M.highlight.set(hls)
    for group, value in pairs(hls) do
        vim.api.nvim_set_hl(0, group, value)
    end
end
get_buffer()
floating window のバッファ番号を取得する関数である。neovim にてバッファは vim.api.nvim_create_buf() を使うと簡単に作れる。
nvim_create_buf({listed}, {scratch})                       *nvim_create_buf()*
    Creates a new, empty, unnamed buffer.

    Parameters:
      • {listed}   Sets 'buflisted'
      • {scratch}  Creates a "throwaway" |scratch-buffer| for temporary work
                   (always 'nomodified'). Also sets 'nomodeline' on the
                   buffer.
(h: nvim_create_buf より引用)
また、バッファが存在しているかのチェックは bufexists() を用いると行える。これらを用いて get_buffer() を作成した。
---@return number
local function get_buffer()
if cache_bufnr ~= nil and vim.fn.bufexists(cache_bufnr) then
return cache_bufnr
end
local buf = api.nvim_create_buf(false, true)
api.nvim_buf_set_name(buf, 'vim-ui-input')
api.nvim_buf_set_option(buf, 'filetype', 'vim-ui-input')
cache_bufnr = buf
return buf
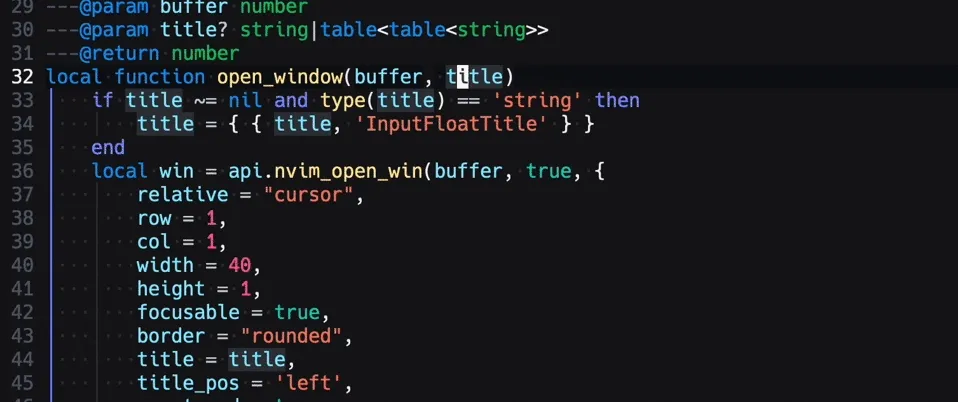
endopen_window()
floating window は vim.api.nvim_open_win(buffer, ...) で作成できる。引数にはバッファ番号といくつかのオプションを渡すことができる。
neovim0.9 より vim.api.nvim_open_win() の第 3 引数の辞書に title, title_pos が追加された。これによって floating window にタイトルを簡単につけられるようになった。
---@param buffer number
---@param title? string|table<table<string>>
---@return number
local function open_window(buffer, title)
    if title ~= nil and type(title) == 'string' then
        title = { { title, 'InputFloatTitle' } }
    end
    local win = api.nvim_open_win(buffer, true, {
        relative = "cursor",
        row = 1,
        col = 1,
        width = 40,
        height = 1,
        focusable = true,
        border = "rounded",
        title = title,
        title_pos = 'left',
        noautocmd = true
    })
    api.nvim_win_set_option(win, 'number',  false)
    api.nvim_win_set_option(win, 'relativenumber', false)
    api.nvim_win_set_option(win, 'wrap',  false)
    api.nvim_win_set_option(win, 'cursorline',  false)
    api.nvim_win_set_option(win, 'winhighlight',  'FloatBorder:InputFloatBorder,NormalFloat:Normal')
    vim.fn.sign_place(1, '', 'InputPrompt', buffer, { lnum = vim.fn.line('.') })
    return win
end
input()
get_buffer() と open_window() を組み合わせて、vim.ui.input() と同じシグネチャを持つ関数を作る。コメントにて説明を入れた。
---@param opts table<string, any>
---@param on_confirm fun(input?:any):nil
function M.input(opts, on_confirm)
    -- 引数の修正
    opts = vim.F.if_nil(opts, {})
    on_confirm = vim.F.if_nil(on_confirm, function(i) print(i) end)

    -- 今回は`opt`のうち、defaultとpromptだけ対応する
    local default = opts.default
    local prompt = opts.prompt

    -- バッファ取得 + defaultのセット
    local buffer = get_buffer()
    if default ~= nil then
        api.nvim_buf_set_lines(buffer, 0, 1, true, { default })
    end

    -- promptの修正、例えば "New Name: "というtitleが来るがこれをtitleにすると
    -- ": "という余計な部分が気になる。これを削除する
    if prompt ~= nil and type(prompt) == 'string' then
        if prompt[1] ~= " " then
            prompt = " " .. prompt
        end
        if string.sub(prompt, #prompt - 1) == ": " then
            prompt = string.sub(prompt, 1, #prompt - 2)
        end
        if prompt[#prompt] ~= " " then
            prompt = prompt .. " "
        end
    end

    --- ウィンドウを作成しインサートモードへ
    local window = open_window(buffer, prompt)
    vim.cmd("startinsert!")

    --- <ESC>でキャンセル、<CR>で確定(on_confirm呼ぶ)
    vim.keymap.set('i', '<ESC>', function()
        vim.cmd("stopinsert")
        api.nvim_win_close(window, false)
    end, { buffer = buffer })
    vim.keymap.set('i', '<CR>', function()
        vim.cmd("stopinsert")
        local input = vim.fn.getline('.')
        api.nvim_win_close(window, false)
        on_confirm(input)
    end, { buffer = buffer })
end
設定
require('rc.ui.input').input() と呼ぶのは面倒なので metatable を定義する。
setmetatable(M, {
    __call = function(_, opts, on_confirm)
        if vim.in_fast_event() then
            vim.schedule(function()
                M.input(opts, on_confirm)
            end)
        else
            M.input(opts, on_confirm)
        end
    end
})
以上で rc/ui/input.lua は完成である。init.lua などで次のようにして vim.ui.input を自作のものに置き換えればいい。
vim.ui.input = require('rc.ui.input')